The Trucker’s Hitch is a knot that is widely used by truckers and is one of the fundamental ways to secure a heavy load to trailers or trucks. It ensures maximum strength and great tension with a loop system that acts as a pulley. This knot will give you peace of mind, knowing that your load is secure while driving for long distances.
This knot is hugely versatile and can come in handy for securing large sporting equipment (kayaks, canoes etc.) and even Christmas trees to the roof of your vehicle – it’s a knot for all seasons!
HOW TO TIE THE KNOT…
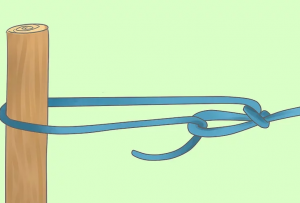
1 – Tie one end of the rope to a sturdy anchor, such as a bumper, a post or a cleat. The loose end will now form a slip knot.
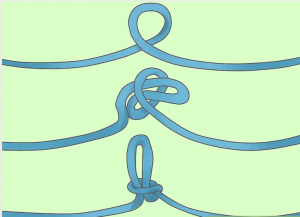
2 – Halfway down the rope form a loop and hold it in a place where it crosses itself. Use your thumb and forefinger to pinch the crossed section of rope – this is known as a crossing turn.
Using your other hand, further down from the turn -feed the rope through the loop.

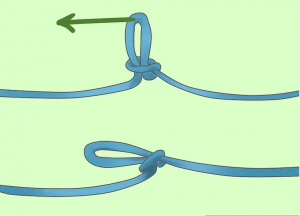
3 – Now you can free your fingers by cinching the first loop as tight as possible. To do this, you must tug at the side of the loop which is feeding towards the anchor and the rope which feeds into the first loop. You have now created the slip knot for your truckers hitch – which is to be one loop in the line that protrudes from the newly tightened first loop.

4 –Just like step one – anchor the other end of your rope to a sturdy post or something similar. It’s important that whatever your anchor is can support and secure what your rope is holding. For your load not to become dislodged in transit, reinforce the knot by pulling the rope firmly so that it is nice and taut between the two posts.

5- Feed the unattached end of the rope through the existing loop until you have no slack left in the unattached end of the line. This is another way of tightening and securing your knot.

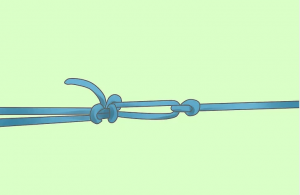
6 – Finally, complete the trucker’s hitch by creating two half-inch hitches or locks. Do this by taking your unattached end around the two strands of your rope that come after the knots. There should be two strands to your post-knot line after you’ve fed it through your anchor post and brought it back to your knot to tie…
Form a loop by leaving the unattached end loose as you take it around the two post-knot strands. Feed the unattached end through this loop and ensure you pull it tightly, and then wriggle this to the end of your knot. This forms your first hitch/lock.
Repeat this same manoeuvre after the place in the line where you’ve just tied the other lock. Now pull the remaining end through the loop, but pull it so the unattached end sticks out from beneath both locks.
Pull your knot tight and you’re ready to go!
There are several variations of this classic knot and all of them have many advantages. Under the biggest tension they are non-jamming, can be tied anywhere in a standing part of a line, and they are still easy to untie.
Just fill in your details below and we’ll send you a free theory test practice with.
Just let us know your score...
We reserve the right to contact you in the
future via this email
By Signing up, you agree to our Terms & Privacy Policy
By Signing up, you agree to our Terms & Privacy Policy
By Signing up, you agree to our Terms & Privacy Policy
By Signing up, you agree to our Terms & Privacy Policy
By Signing up, you agree to our Terms & Privacy Policy